24 December 2014

Somewhere to call my own - - - "in fast forward"

Those of you who have followed my blog have watched my many attempts at making a sewing space that I could be comfortable in.
These attempts have been "make do" compromises and far from Perfect.

Today I am happily sitting in my 
"On Purpose - Renovated just for me - Nope - Not sharing with anyone else" - Sewing Room!

* * * * * *

It has been a lot of work - and mess.  Emptying the room has meant that everything in it including my sewing stash and paraphernalia has flowed out into the rest of the house.
(So what else is new?)

The decision to remove the old unsafe glass sliding doors - of course led to more mess.

At last after 30 years - they are finally gone.

And just a little bit of alteration needed to the doorway.
 - In 20mm Up 20 mm - 
Why do they make 'standard size' doors when no one's house has standard size doorways?

Removing the architraves resulted in the old paint stripping off the wall as well.
Following the "Right thing to do" code meant getting the paint scraper involved, and cleaning off all this old paint until it reached a natural stopping point.

(There is more to come off but we will leave that joy
 to the next owner of this house!)


I then filled cracks that had been hidden by the pelmet and skim coated everything else.

Sanding down the filling created even MORE dust.
Which has settled on just about everything!


Washing down the walls is never any fun, and a part of painting a room I rarely observe - but seeing there is a wood burning fire in this room - It was necessary.

(Urgh! Never realised it was THAT dirty!)


Now the Fun part...
Painting
I hope the colour choice works.

Oh dear ... It looked REALLY good on the paint chip.
(It doesn't look it here but it was WAY too bright!)


This time try a sample pot -
Still blue but with a TEAL base -
Much better - much more "ME".


And of course -
going shopping for cupboards
to keep my stash in.

(Where else but Ikea?)


And putting them together.


Along the way we worked out a bit of a sewing station - extending my machine table.
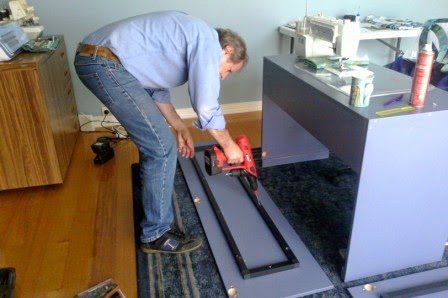
We made this from some cupboard doors that were left behind from another room renovation a few years ago.


New Bi-fold doors, so I can close off my mess from visitors.
More glass - only this time it is safety glass!

- Just one more thing to do is Paint them
and replace the architraves

But that can wait until after Christmas!


Moving in.

Everything has to be found and brought back into it's new place.


At last - a space of my own.
Our rarely used front Lounge Room, with it's large North facing windows - is now my sewing studio.


And the Wood fire? 
It is still there - behind the ironing station - All cleaned out and ready to fire up. Just incase we want to revert it back to a sitting room.


So there you have it - the last 3 months in 'fast forward'.
Now all I need is a really nice Clock
and TIME to play in here!


Credits:

Thanks to my wonderful DH who recommended that I use the room.
Who is REALLY good at wrecking stuff (not so good at the fixing bit).
Who plied me with cups of tea and dinner out - so I could work.


PS: The one behind the camera & the paintbrush - that's me!


19 December 2014

The Colours of Christmas

Recently, the question was asked "What Christmas Colour are YOU?"
Many of the replies were Red, Red & Green, Red & White, Red & Silver ....
My answer?

PURPLE!
and Green.

The Jacaranda Trees are magnificent this year - and when I see them starting to show their Purple blooms
I start to hum "It's beginning to look a lot like Christmas".


And of course no Christmas would be complete without the show-off of the season - The Agapanthus!


A quick trip around the garden with my camera
 revealed lots more Purple and Green -


The everlasting "Statice"
which symbolises Remembrance.


Catmint -
haven't met a cat that likes it yet!


and even the Lavender decided to put in an appearance!

So - these are MY Christmas colours.

What are yours?


18 December 2014

My Christmas UFO

This is possibly my longest UFO,
42 inches long actually!
and I have taken a long time to make it as well.

It is called "The Cat's Meow" by Concord Fabrics, I am fairly certain it predates any other Quilt fabric in my stash.

I have no idea when I started this ...

I have 3 of them and each one is in various stages of being beaded, sequined, and embroidered
(ok, maybe not embroidered).

But they have been quilted - of sorts...
What concerns me is the wadding I have used ... is ... foam - and it looks like it has been recycled from something else.

So much work and it still isn't finished.


11 December 2014

Finished - Almost . . .

I have come to the realisation that, in quilting, there are varying degrees of "Finished".  
Today I have come to one of those points.
YAY! - WOW!- HOORAY!


My Bali Wedding Star top is finished!

The blocks are together and it is lookin' pretty good!


The 'road map' tags have finally been removed.
They have done a fantastic job of keeping the colour graduation in order and have saved me lots of headaches!


The quilt can now happily go off to be quilted  
. . . BUT . . . 
(and this is where the varying degrees of finished comes in)

A little while ago I decided it needed to be bigger!
The pattern box contained all the papers for the Flying geese border - so why not make them?

It's 'just a border'...
and THEN it will be finished...

They were flying together quite happily until I started thinking about something else...
How on earth did I manage this?
Two papers picked up together and in perfect alignment sewed them together!
What a Goose!

If I can give any advice to anyone starting out
 making one of these quilts it would be
1 - Read ALL the instructions
2 - Points DO matter
3 - Don't Rush it

...now - Where is my unpicker?


5 December 2014

Flowers on Friday - Pink Tipped Callistemon

We have a tree planted in the Nature Strip outside our home

It is an Australian Native
and most of the time it looks fairly ordinary
and pretty much the same as all the rest of the trees in the street


That is - until it flowers!
the rest of the street trees have Red flowers
Ours is very much NOT red.


The Bees just adore these Pollen laden flowers 
and for one week in October the tree is buzzing with hundreds of Bees.


and then when the winds have blown the stamens away
 leaving just the seedpods,
 it is time for the new growth to appear


and THIS is why it is called a
PINK TIPPED CALLISTEMON


4 December 2014

Oh my Stars . . .

This
(bundle of Stars)


lives in this
(something to do while waiting kit)


with a whole lot of other things
(essential supplies - note the lollies!)


It was SUPPOSED to become a 'Nebula Quilt'
but I find that Hexies are much more popular than diamonds
So maybe it will become a 'Nebula Table-runner' instead...


So - Where was This on Friday Night? 
- At Home.

Where was I ? 
- In Casualty (E.R.) 
with my Mother who has 2 Fractured Ribs after tripping in her yard.

Thought for the day - 
Take up Hexies
Leave kit at front door!


27 November 2014

Bali Wedding Star - Progress report.

"Where was I?"
That question - is the one I ask myself every time I pick up this project.


Then I lay out the blocks
- YET AGAIN
... and thank whoever it was that suggested I make a "MAP" of this quilt.
(Thanks again DH).


It certainly made it a lot easier to keep my colours in the right order while sewing the small blocks into bigger blocks.


And when you find that you are walking around the house 
trying to find SOMEWHERE to lay this quilt out - 

It's time to "look outside the box"

Or in my case - The House.
It was a beautiful day outside and all I had to do to access all that floorspace was move a couple of chairs and sweep the deck!

All my enthusiasm soon evaporated when I realised I had not been too careful when lining up my seams.

Some people say
"It doesn't matter" -
I am afraid - for me -
It DOES matter!

So out with the unpicker
and
"Do the Frog Stitch"

c a r e f u l l y - unpick each stitch

and sew them back together again.

This time it is much better - still not perfect - but considering this fabric frays like crazy everytime I touch it - It will have to do.


So now the quilt is back on the floor 
and I am CAREFULLY sewing the blocks into diagonal rows.
And I have realised that - it is really going to need the Flying Geese Border.....

21 November 2014

Flowers on Friday - Jacobean Lily

Jacobean Lilies always remind me of my other Grandmother
- The One with the Green Thumbs that extended all the way to her elbows!
The One who was "Closest to God when she was in the Garden".

I always admired them and when I asked were they hard to grow - her reply?
Oh No - These things will grow on a Tip!

These plants came from THAT garden.
They have been dug up, thrown in a corner, into a pot with no dirt other than what was pulled up with them, neglected, mowed over, forgotten.
Yet they still bloom and without fail - when I am greeted by this vibrant splash of Red I remember my Nan and her Garden that was full of unusual and fascinating plants.

So, when I had an opportunity to make one from Sugarpaste -
how could I not try?

However, this flower proved difficult for me, I could not get my flower paste to work properly and I got despondent with my inability.

I was packing up my kit when the demonstrator noticed - she came over, gave me some of her paste and encouraged me to try again.

What a difference that new paste made!
Until then I had no idea that I needed to find a paste that suited ME!

I came home with a flower (that looked vaguely like it should), a ton of enthusiasm and a desire to learn more.


14 November 2014

Flowers on Friday - Grevillea

Grevilleas are great plants for an Aussie Garden.
They look after themselves, require little to no pruning (unless you need to keep them in shape) have beautiful blooms and survive on rainfall.

I have several in my garden.  This one is Molly, she has a compact growth making it suitable for small gardens and it loves to be cut back after flowering.

(Just as well, as it is growing beside the path!)


It is also a favourite with the Birds...

New Holland Honeyeater having breakfast ...


and a Wattlebird pops in for Lunch.


12 November 2014

Monogram Challenge

This month the Janome 6500 Challenge Group were challenged to create a MONOGRAM using the inbuilt TEXT feature of our machines.


The biggest challenge for me was actually making the time to do the piece.
When it was finished, due to the size of the inbuilt letters, it hardly looked like a monogram at all.


So I set about to try my hand at something a bit more elaborate, and for me - much more challenging.

Free Motion Embroidery in a Hoop.

I found a suitable font on the computer, enlarged it and transferred the letter onto some stabilizer.
The hoop is just one I found in the back of the cupboard from another lifetime ago when I tried my hand at embroidery.

Placing it under the needle before putting the FMQ foot on gave me the clearance I needed.


I then set about squiggling and swirling and generally having a lot of fun 'colouring in' the outline.

I was rather surprised that it was working so well
- for a FIRST try!

Especially seeing my FMQ-ing skills are - not so wonderful
And I was using Metallic thread!


Now comes the FUN part!

In another first I used DISSOLVABLE Stabilizer.

I barely had time to snap this photo as the stabilizer disappeared in the warm water.

WOW it worked - I am going to have a LOT more fun with this stuff!

Taking it out of the water and reforming it into it's correct shape I could see that I had not quite caught all the threads with my squiggles.

Never mind
- it is a prototype after all.

A quick trim and back under the machine to attach my Initial to a coaster.

No need to pin as the stabilizer had left a tacky residue which held the piece in place.


These challenge pieces didn't take much time at all out of my day.
It did, however, set me off to try something new, there were 3 different things I had never attempted before.

So - Why not challenge yourself to try something new today?