Showing posts with label Tool for a job. Show all posts

22 September 2023

I have a New Toy


Last December we went on a Mystery Picnic where one of our Picnic Items was "Fresh Squeezed Juice" and my heart sank, because...

Back in the 70's my Mother got a Juicer and made us drink concoctions that were 40% Juice and 60% Foam and they were NOT nice.


I am happy to say that our "Picnic Juice" was VERY nice and we started noticing and using DIY Juicers in our Hotels at Breakfast.

We came home and forgot about the Juice of our Holidays - Until I saw an Advert for a machine that ticked all my boxes and some. 

So we bought one.

It came with some accessories that I probably won't use 
(I am even less fond of Smoothies and prefer to make my own Sorbet) but then, I didn't buy this model for the accessories.


As far as the Juice is concerned... It is pretty impressive.

I am not quite ready for Kale and Cucumber but I can now understand what People see in Tomato Juice!

* * *


FYI:
Kuvings EVO Evolution Cold Pressed Juicer in Red. 


22 April 2022

Old Chair - New Chair

Another lifetime ago MY Little Girl was given a small Arm Chair by her Grandmother.

It saw a Lot of use in those early years and the other day I brought it out of storage with the intention of reupholstering it.  

Before I was able to get started - Little Miss A visited unexpectedly and saw the Chair.


"Do you like this?" asked Grandpa.  
Pointing to the tear on the arm she casually replied - "No!"
She changed her mind when we showed her the upholstery fabric.

* * *


We carefully dismantled it - Taking photos of each step and making notes on the frame as to which way was up.


I found a few lost items in the process - The standard Lolly wrappers, A Tasmanian Devil Tazzo (circa 1990) and The missing Blue Knitting Needle that belonged to my Grandmother.... or what was left of it.


We decided that the webbing was still tight enough for this makeover, so new Foam and Padding was all that we needed. 


I cut out the new Fabric using the old as a pattern giving myself a generous allowance in case the foam was too thick.  Just as well as I needed every inch!

My Father had a saying and that was - 'Get the Tool for the Job'.  So taking his advice I bought a Ryobi Cordless Staple Gun. 

It made things SO much easier than the last upholstery project I did!


Just for fun. 

I added a piece of the original Brown Vinyl upholstery fabric and a note as to when it was originally bought and when it was reupholstered.


With interruptions - It took about 2 weeks to do and looks SO much better now 

... and ready for a whole new generation (and one very spoilt Cat) to enjoy.  


18 July 2021

Constantly playing Catch up.

In my defense - My Laptop has died! So - This post is being brought to you by...

My Mother's very ancient and never used Dell Inspiron which is running Windows 7.  
It's a long story involving DB, a Nephew that moved to Darwin and a Mother that is a HUGE technophobe.

We are in Lock down - AGAIN. Version 5.0 and the shops are shut for anything other than Click and Collect. So what better time to work out if I actually need a new 'you beaut, all the whistles and bells' computer just to write my Blog?


The poor thing has no programs to speak of other than Office 2010 so I will have to find a photo editing program that will actually work on Windows 7.  Maybe there is something in the "Great Stack of Useless" before they go to Recycle?

I suppose that this experiment will also help with the Other question which is "What do I do with a 14 year old laptop that is basically in Mint Condition!"

The Verdict?
It is actually a nice machine with a large non reflective screen.  I think it will certainly make a very good back-up for Word processing and Internet searching and watching Tutorial Videos in the Sewing Room. And the odd 'Instagram Style' Blog Post.


15 February 2021

Making Life easier?

I have been working on a Mystery Hexagon Quilt since before Christmas.
It is my first attempt at a "Real" Hexie project - So I have a LOT to learn.

I bought fabric in lengths that could be divided into 2 1/2" squares and then learnt that my Hexagons are actually cut at  2 5/8" x 2 1/4" (65mm x 56mm)
Which shouldn't be a problem only that some of my fabric wasn't cut quite ... to size.

I found I could get more use of my fabric and sometimes more Hexagons if I cut them 'Points across' rather than 'Points down'.  

I can cut 36 pieces one way and 42 the other from this piece of fabric.

So I had to find an efficient way to measure and cut my strips.


Eventually I hit on THIS idea.

By sticking an actual fabric Hexagon to the back of my ruler (With the ever trusty and removable double sided tape) I not only achieved a regular size to cut to in either direction


Trimming each piece became a lot easier

and

It also made my small ruler -
Non Slip!


29 January 2021

Tool for a Job

 They say "Necessity is the Mother of Invention" 


and I needed to come up with a Cheap and Easy replacement for these!

At $15.00 (AUD) for a pack of 12 they are out of my price range for something that doesn't last all that long.

Also, having to go out and source them or wait for the Postie... when I was on a roll with my Hexies I needed an alternative fast.


So - what do I have in the Sewing room?

Double Sided Sticky Tape from my Scrapbook Project. 
($1.00 a Roll from most $2 Shops.)

And Some Faux Suede and or Leather offcuts that date back to when I was making Soft Toys.

(Also just a few $$ if you buy a minimum cut or a Craft Square.)


It certainly has done the Job.
No more Punctured fingers!!

The Suede is soft enough to not notice I am wearing the Pad, and the tape peels off easily and is re-stickable.  
And when it does stop sticking, I just replace the pad or the tape!


Now if I could just convince my Hand Model to finish those Flowers......


19 May 2020

Today's Colour Is ...

SILVER TEA SERVICE

One of the 50 (Million) Shades of Grey.

A definite improvement on the Off White Walls that met a White Ceiling, that did weird things to my eyesight.

I need Horizons, and with no Cornices this is neither an Easy or Quick paint job!

There was a bit of "Trial and Error" in the process, but have settled on a method of Cutting in with a wide flexible 'Patch/Scraper' that keeps the paint off the ceiling.
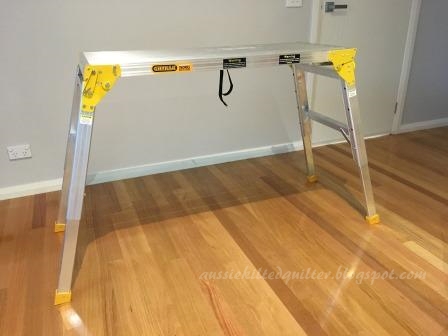
The Job has also been made a LOT easier with "My New Toys".

I now have TWO of these beauties.

Fully extended they are 900 mm high - for my height it is just right to reach the ceiling.

And they lock together to form longer platforms. 

However, I am really excited about the possibilities of using these in the Sewing Room.
I have ideas of using them to take my big Ironing Board or adding a top to lay out Quilts.

I am sure it will not be the last you will see of these!

And just before I go - Here is the Surprise find for today.

Stuffed into the wall behind the power points were two plastic bags per power point.

Someone obviously has not heard of RECYCLING!


13 March 2020

I think I need help.


1. Needles

You know you need to go visit the Optometrist  when you need to resort to using a Macro Lens on your phone to see what size needle you are using!

2.  Leaders and Enders

They were a good idea at the time, but does anyone have any idea as to what to do with these?

Or do I just keep making them until eventually they take over the sewing room?


20 February 2020

New Chair - Old Chair

Have you ever had that sinking feeling when you sit on your Office/Sewing Chair and it sighs into the carpet?
No - you haven't had too many TimTams with your Cuppa!

Chances are the Gas-lift on your chair has failed.

A trip to Officeworks to replace your chair ends in frustration and confusion or great expense.

$279 for a new chair and the dilemma as to how to recycle/dispose of the old one ... OR


Fix It!

After all it is JUST one bit that is not working - everything else is FINE!

$15.00 for a new Gas Lift

5 mins watching a "How To" video

a Rubber Mallet (of course we ALL have one of those - I do...)

and some WD40


basically once DH admitted to needing the WD40 (lubrication)

the Job was done!

I now have a "New" Chair
and I can eat as many Tim Tams as I like without feeling guilty   :D


4 February 2020

Working with Colour

It all started when I found an easy pattern on line that used a packet of Jelly Roll Strips.
I don't know why, but I have several and they are VERY bright.  One in particular goes by the Title of "Northern Lights" - 
Should be a nice break from my Temperature Quilt.  


I had decided also this year, to not buy any fabric and just work from my stash.
That resolution failed after 3 hours of searching through my very neat piles of fabric and realising that I have "Too many Principles and not enough Cast"! 
- I had NO background fabric.

Road Trip!

I scurried down to GJs in Fairfield as I had a fair recollection that, in their "Great wall of Fabric" there was an awesome variety of Batiks.

I was not wrong. 


With that sorted all I had to do was decide what ACCENT fabric to use for this selection of colours


At this point I asked DS#2 his opinion.

His response was to give me a One Hour tutorial on Colour Theory using the Colour Wheel that I found online.

It's not perfect, but after all it was a child's colouring sheet.


He found a better one.


and apparently I need an Orange/Yellow.


This is going to take me way out of my 'comfort zone' but after all- 
Isn't that the point of working with Colour?


29 December 2019

Garage Floor - The Final Chapter

I have recently realised that I have not put in an update on out "Garage Floor Project". I left the story on July 13 stating that the Tradesmen "would be back on Monday"

Many Mondays came and went by without a trace of a Tradie. - When they did turn up, they sealed and sanded back once again and left a "sample section" where these White patches are -

And now we wait. . . . . . and wait. . . .

And the bubbles came back.

And when we got tired of waiting - we called in on them at their Office, walking in on a Colleague who suggested a different product.

"It's expensive - and it has to come from Queensland"

Their reply.... "I don't care - There is some 'Serious *bleep*' going on here - 
and We have to fix this!"

OK - so now we wait once more for Stuff to be sourced and sent down from Qld.


And here we are - AGAIN, having the concrete sanded back and undercoated.

I am sure the neighbours must be wondering what the (insert descriptive term here) is going on!


And Once again there was an issue - the original problem has resurfaced. This time it is not so difficult to rectify.

It looks like we MIGHT be winning the battle!


With the few issues in the undercoat "Spot treated" 
- it was now time to apply 
THE Product.

Honestly, These Guys have been doing some very serious Penance!

No painting on with a roller this time.
This time it had to be trowelled on!

Another week to cure. . .

And on one of the hottest days this year, with a mean North wind blowing right into the garage -
They sent someone to put the final coat on.

I tried to send him home but ended up plying him with glasses of ice water instead.

For Two Full weeks, we put this new Product through our 
'Ultimate Test'

when we pulled the Carpet back. . .

It was DRY
And there were NO bubbles.


Six months after we started - We called it DONE!
* * * * *

  
On a footnote to this whole saga. The company we dealt with had to fit us in around other jobs, but never gave up on us. The product they eventually tried was New to Them, so we became their Test Case and they are now using it on another Job in the new year.
When they said all those months ago that they had 'Never met a floor they couldn't fix' they can now say "no seriously - we had this garage floor and........"


27 April 2019

Yet another Sewing Room makeover

It all started with a simple text message from DS#1...
"Hey Mum.  Did you have a use for my old table I made in High School?

I don't want to see it go but have no use for it."

Oh bother! I didn't want to "see it go" either - So many memories Good and Bad are tied up in that beautiful Timber and Metal table.


Considering He'd also recently returned 'Nemesis' - my Desktop Computer - and DS#2 has once again, updated for me.

(I am not sure how much of the original build is still left!)


It seemed fitting that I put the two together and at last give myself a computer area.

The only problem with that was - it didn't fit in the Sewing Room.

Or rather - it didn't fit the way things were!


Time to get rid of the "Make Do"
I have had for the past 5 years or more and make something permanent!


First Stop - Officeworks, to get a table.

Hmmm, the Top was perfect but the (optional - choose your own) legs made the whole table so unstable they had to go back!


Then to Ikea.
Which is nowhere near where I live!

Their Desk tops were Hollow-core so no good for what I wanted to do - which was, of course....


Cut a whopping big hole in the top of it!

Which wasn't as easy as it looks.
But we got there.


Then it was some more aerobics to fit a shelf underneath the hole (with the aid of some curtain track brackets form Ikea).


The table top is now secure, sitting on 2 Ikea drawer units (which are way more useful than wobbly legs any day) and fixed to my Cutting/Work table with a set of these nifty "attach table to bookcase" brackets.


So here it is ... the latest incarnation in the quest to find the perfect spot to sew.

It is NOT going anywhere any time soon and I defy it to wobble!


Now, Where did I leave my Quilt binding?