27 February 2018

Honey Harvest and Bonus Bees Wax


Since my last Post I have been to the local Brewing Supplies shop and bought a length of 25 mm Food-grade tubing to extend the Flow tubes into the Bucket.

A small roll of Blu-tack around the tube at the lid and it became Spill, Water and Anything-else proof.
So, with that happily flowing by itself, we went inside to tackle...

...The Messy Bit!!

We now have the task of removing the Honey from the Traditional Frames.
Without any specialist Honey Extraction equipment, It is sticky and messy and...

OH?
Those frames I put into the Hive back in March - looks like they did not have Foundation Wax on them. 
That means TWO frames have 100% Bee-made edible Honey in the Comb.

All we have to do is cut the comb out of the frame and box it up!

The rest of it - Urgh.
Pretty unusable as far as the Honey is concerned.  It is very strong Brood Honey and most of the frames will go back to feed the Girls over Winter.

And those that are very old?
I am told They produce the Best Candle Wax, so will be melted down, filtered and added to the growing collection of Bees Wax.

I am still trying to work out the best way to do this.
But on a day like today when it is good an Hot.
Outside on the Deck under Glass = Solar Oven!

Is it worth it?

Of Course it is! - Without Bees we won't survive. 
We give them a Safe place to live and in return
They Pollinate our Crops and provide us with the most beautiful healthy liquid that is HONEY.

We Harvested 9 Kg of Honey from 4 Flow Frames and 3.8 Kg of Honeycomb from 2 Full Frames.

And The Girls have more than enough in Store to last them over a Melbourne Winter.


20 February 2018

Checking on The Girls

It was Warm and Calm and just the right kind of day to inspect the Hive.

I have not been professionally trained in Bee Keeping, so was only able to give it a quick 'once over' while DD was in France.

I cleaned up a bit of mess and swapped in a couple of empty frames.


And mid December, The Flow Hive went on top of the boxes - 
To "Keep the Girls occupied" until DD got home.

A FULL inspection was needed and just as well - What a Mess!

One of the frames I put in earlier in the year had collapsed under the weight of the Honey and The Girls had started to build off that - sticking everything to the floor and sides of the Super.

The Flow frames had been filled, capped with tiny 'scales' of wax and were ready to harvest.

The idea of the Flow Hive is to not disturb the Bees - so removing them is (under normal circumstances) unnecessary.
So - back into their Super they go!

DD was rather excited about her First "Harvest" from the Flow Hive!

No suiting up is necessary using this method.
The Bees are fully occupied with business as usual out the front of the hive, so not concerned about what we were doing round the back!


Well, maybe the odd Bee or Wasp will come and see what is going on, but they are quickly 'shooed' away.

We will look into a better method of bottling the flow for the rest of the frames to avoid this happening in the future.

A simple extension of the pipe that goes directly into a lidded canister will be sufficient.

There is something Magical about being able to have Honey drip from a Hive straight onto your finger.

It is warm, coming out of the Hive at between 30-35℃
And it Tastes... Strongly of Red Gum

Oh WOW!


19 February 2018

Wedding Cake - The Final Chapter

The Weekend is over and the mess has (almost) been cleaned up and I can now sit and write the Final Chapter in the Wedding Cake Posts.

For the Cupcakes, finding the right Cases was the hardest part.
They had to be the 'right' size, be of good quality paper (so any oils in the batter didn't leach through) And of Course they needed to Look Wonderful on the display table.
And they had to be BROWN!

I spent Thursday Morning making cardboard dividers to go in my Cake boxes so they didn't shift in Transit.

And got up REALLY early on Saturday morning to Pipe all the Icing Swirls and add Decorations.

Friday was spent making and assembling the main Cake -
This is the one that the Bride and Groom will Cut together at their Reception.
Stacking it and Making sure it was LEVEL.
0॰ - I am Happy with That!

Now came the 'Tricky' part -

How much Icing DO you put on a Naked Cake?
I have seen some cakes with almost none and some with Lots - So how much is too much?

No Idea!
So I just slathered it on and then scraped it off again - and Hoped for the Best.

Once that was done it was time to box up and Stow the Cakes ready for transport.

Don't forget Your Kit this time! - Essential for Setup and any Repairs that may be needed.
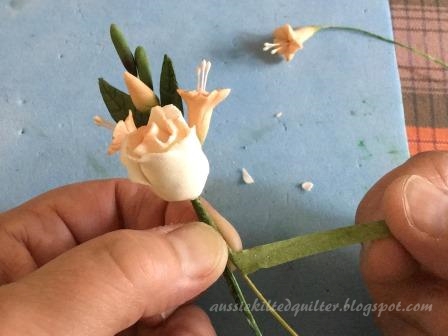
- I also took some extra flowers.

Here's a Tip - when Transporting Cakes, let other Motorists know just WHY you are taking your time over Railway lines and Roundabouts.

My not so little sign was invaluable during the 77 km (1 Hour) trip to the Reception Venue.


Once there, we were able to unload in the shade of the Wide Veranda.

It is times like this I am very delighted to still have my trusty Station Wagon - and a very useful DH as well!

Unfortunately, when you are busy setting up - you tend to forget to take Progress photos.

And in this case the Back light from the Bright Summer Day coming through Glass Doors made it almost impossible. 
It was so bright that at times, we couldn't even see what we were doing.

But the Venue - St. Anne's Winery at Myrniong (Between Bacchus Marsh and Ballarat) was a Beautiful setting for a Country Wedding.

It took an Hour and a Half, from arrival to driving back out the long gravel driveway and leaving weeks of work behind.

Not knowing if the Bride and Groom will like what I have made for them.
Hoping against Hope that the Cakes will be lovely and Moist by the time they are served.


For Me
It is Over.
My Work is Done.

For them
The Journey has Just Begun.


David & Eva
17th February 2018


Postscript:  I am hoping to be able to post more photos later, once I get some that were taken at the Wedding.

15 February 2018

Wedding Cake Part 5 - Am I having Fun yet?

This morning I sat at the Kitchen table in Prayer and Contemplation of the day ahead.

I needed all the help I could get!
I Prayed for Clarity of thought and no "unnecessary distractions".

And when I finished I wrote a list,

On my list at the bottom was "Enjoy yourself - this is Supposed to be fun!"
I laid the soft fall matting behind the bench and got started....

Well I got started AFTER washing all the storage containers that I had to put the cakes into once they were baked.


I have lost track of how may times I filled the sink and washed the bowls and beaters and tea cups.
("Stay Hydrated"
was also on the list).

I learnt NOT to turn your back on the mixer if you are trying a new attachment (smaller bowl).
At least this was only a batch of Vanilla cupcakes to ward off the raiding party who wanted 'samples'.

(Sorry folks this is an order - NOT for tasting!)

I Mixed batch after batch of Chocolate Mud Cake.

[I used to LOVE making Mud Cakes as a child and baking them on the roof of the Shed, but then that was when they weren't a "Thing" and were actually made out of Mud!]


And Just as the last lid went on the last container....

Emergency Sirens came wailing into the street
Our 'troubled' neighbour up the road finally set fire to his house.


Well - at least the distraction was AFTER I had packed up for the night!
In the end there was not much damage and we had a nice 'catch-up' with the Neighbours while watching the Firefighters.

Tomorrow - Assemble and Ice!


14 February 2018

Wedding Cake Part 4 - The Cake Stand

Oh how I have had issues with Cake Stands!


One order a few years ago saw me having to make a much larger cake than the Bride wanted because her MIL-2B insisted on having an exceptionally large footed stand. 

I still believe to this day it would have looked lovely with floating candles in it instead of a cake!

(Click this link to read the full story)


This time the Bride and Groom are wanting a "Rustic Country" Wedding.

The Venue, a Vineyard in the Wine Region of the Victorian Goldfields - Ballarat

So they have opted for a Hand Made Stand using Raw Timber Rounds, which will sit to one side of the Bridal Table on top of a Wine Barrel. 

I finally got the photograph of it yesterday.

I won't be seeing it for real until I get to the Venue to set up on Saturday - SO

Enter a Stand in ..... Cake Stand.

Not terribly stable but enough to show the Couple what their Cake MAY look like...

Although it is a little like doing a dress fitting on a dummy with no Bride to be seen!


And this is what I have got so far ....

Nice to know that those extra Flower Sprays may be able to be used.

I spent today crawling into the back of cupboards and venturing down the Bungalow/Storeroom to find enough containers to transport the cupcakes.


Tomorrow I will start to Bake.
(And Pray that nothing goes wrong!)


9 February 2018

Wedding Flowers Pt 3

The Humidity is proving to be a constant problem.  I had to stop working yesterday as I felt the flowers were softening again. But Thankfully, the Main Bouquet is Finished and Safely 'under wraps' until I can show it off - ON THE CAKE!

It is always a Good Practice to make more flowers than you need - These things are VERY fragile and can easily be broken.

(See what happens when you don't pack the cake properly
in THIS POST)

Today it was time to Play with the 'Leftovers'.

A few Leaves and then some Filler Flowers to start with, then a little Rosebud.

Taping each flower to the next with Florists Tape that goes sticky when you stretch it.


I continued to make Small Sprays using what I had to hand, adding a few extra Blue Forget Me Not blossoms. Because all Brides need "Something Blue".


Taping the Sprays onto a heavier gauge Supporting Wire.

At this time my hands were cramping and my fingers sticky from the Florist Tape, but I was enjoying myself.


After I finished playing I realised that I had a spray that could decorate the Bride's Knife and some very usable pieces that can be placed on the cake if needed.


BONUS!


8 February 2018

Wedding Flowers - How is it going?


Following on from the heartbreaking mess of my last post.

Some of the Flowers and Foliage that I have made for the Wedding Cake are totally unusable...

But with valuable advice from a Cake Decorating Colleague, I have been able to salvage SOME elements.

And then it was back to the beginning - Make more Roses...

1 Large
2 Medium Half Blooms
6 Small Buds
and Leaves

lots and lots of leaves


Under the watchful eye of "He who wants to be Involved in everything"

They were safely stowed in a Large Cardboard Box to dry - away from the Humidity,
and any other Perils. . .


It was then on to the Filler Flowers.

All Bouquets need their supporting act and Filler Flowers can be fun to make as they rarely need to resemble any specific Bloom.

From here the artistry comes in -
Bringing to Life dull lifeless bits of Icing, just like a Make-up Artist, by dusting with Petal dust and Powdered Chalks.

The dust gets EVERYWHERE-
Yesterday, I had Sparkly Sunbeams dancing across the Kitchen Table...

And CAREFULLY steaming them (yes Steam!) to set the colours.

Using too much steam will melt your Blooms OR give them an unappealing Waxy/Wet look, as in Bloom #3.


From here it is on the The Part that I do enjoy the most.
In my Next Post I will show you How I Pull all these together into a Bouquet for the Wedding Cake!